Preventive Maintenance Center |

|
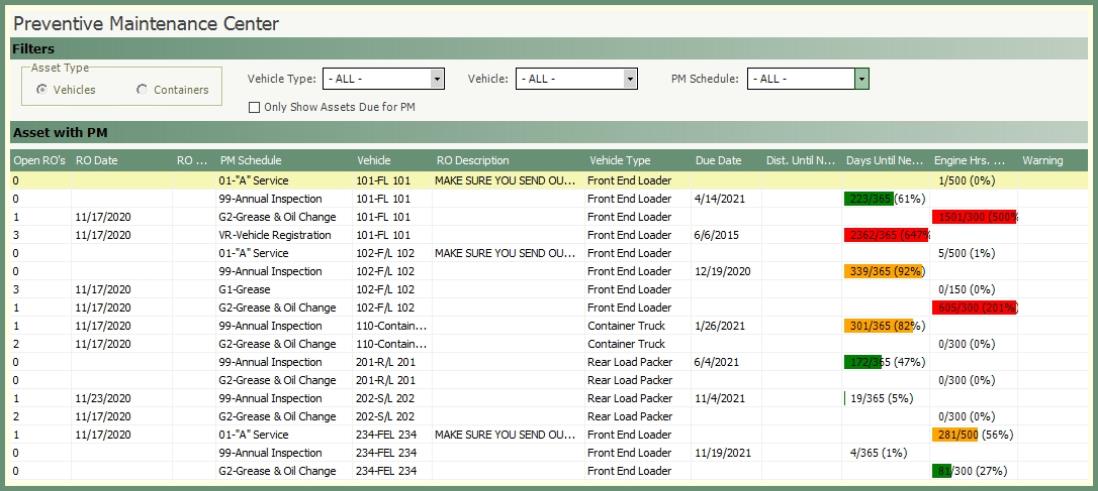
This will be the main center to view upcoming, due and past due PM's by all or specified criteria and schedule the PM repair order directly from the grid.
|
Navigate To: Maintenance>Preventive Maintenance Center OR Click the Oil Can Shortcut
|

New To Maintain-It: Vehicle Readings
This is an important step if your company is new to TRUX. Because the database is brand new, there will not be engine hour or mileage entries in the system. All vehicles will appear as overdue. See your options below.
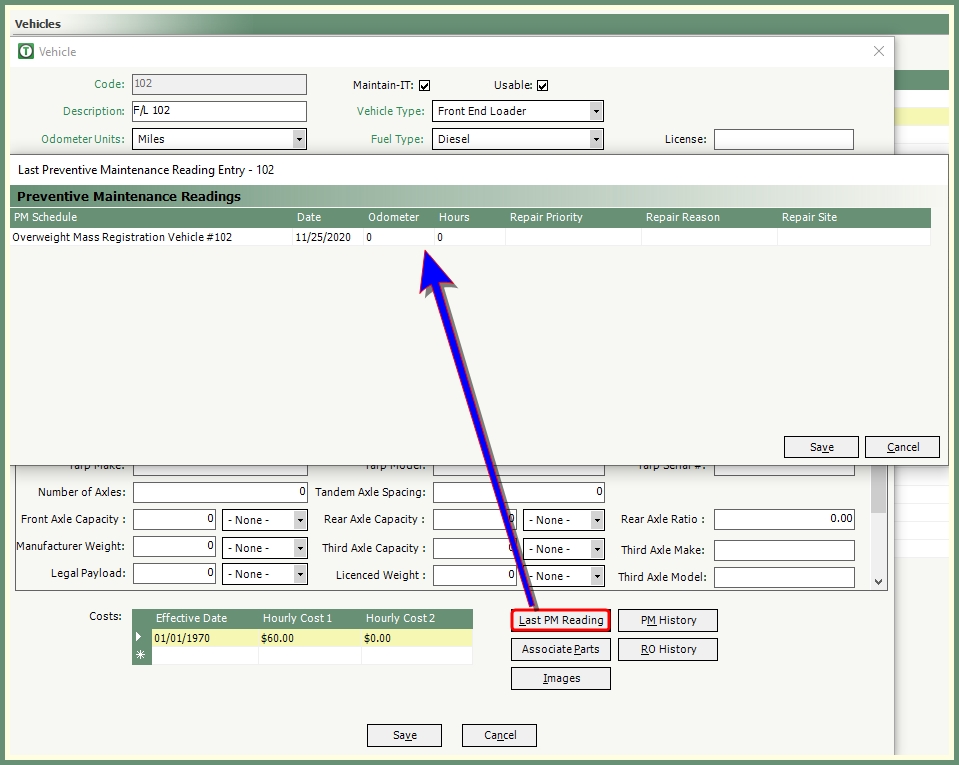
Option 1: Update Last PM Reading
This option allows you to accurately update vehicle readings prior to future PM's being scheduled. (Best Option).
Navigate To: System>Configuration>Code Maintenance>Asset>Vehicle
-
Left double click on a vehicle to open the vehicle screen.
-
Click Last PM Reading.
-
Enter the date, odometer, hours, repair priority, repair reason & repair site for the last time the corresponding PM Schedule occurred prior to starting use of Maintain-It.
Example: Your company goes live on Maintain-It on Tuesday, December 1st. The Last PM Reading updates should be performed following end of day readings on Monday, November 30th.
-
Once all of the Last PM Readings are completed, the PM Schedules in PM Center will be up to date and accurate.

|
|
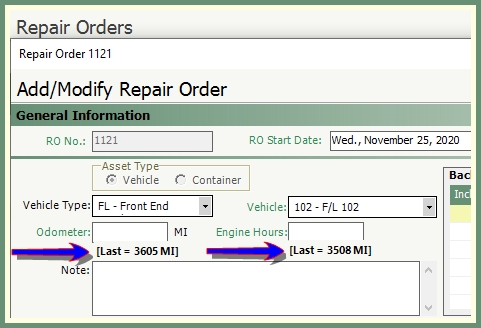
Option 2: Do Not Update PM Reading; Schedule PM's
If previous PM Reading is not updated, Maintain-It will display all Vehicles and PM Schedules as being Overdue.

-
Using this option, PM Readings will slowly be updated as future PM's are scheduled for vehicles.
-
This option allows you to schedule a new PM Service or to view currently open PM Service Repair Orders.
-
As the Repair Order is completed, the Odometer and Engine Hours will be updated.

PM Increments
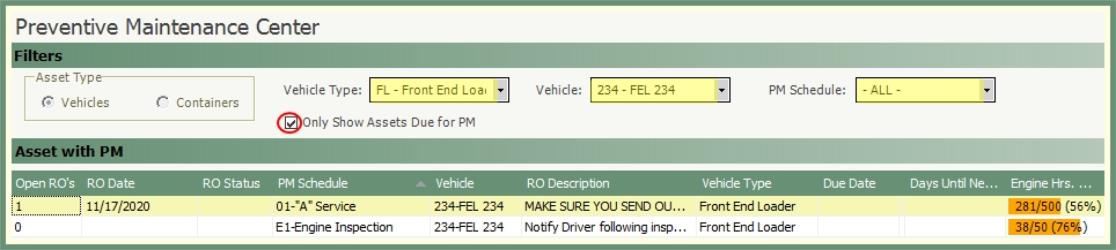
The Asset with PM grid displays two values under each of the columns for Distance, Days and Engine Hours.

First Digit: Represents the number of Engine Hours/Distance/Days since the last PM Schedule was completed.
-
This value is derived from one of three sources: Repair Oder, Usage/Rapid Usage Entry or Haul-It Route Completion.
-
In the above example 281/500; the 281 represents the number of Engine Hours the Truck has worked since the last PM Schedule was completed.
Second Digit: Represents the Due Interval value in PM Entry for the associated PM Schedule. See more about PM Entry here.
-
In the above example 281/500; the 500 represents the Due Interval of every 500 Engine Hours for the A Service PM Schedule.
PM Schedule Color Legend

If an over limits appears to the right of any PM Schedule, it is an indicator to the user that there may be an issue with the data entry of engine hours or mileage. The purpose of the over limits setting is to identify any entries where a number is keyed incorrectly, potentially causing a vehicle to be prematurely serviced.
Navigate To: System>Administration>Company Settings>Maintain-It Tab

-
In the above example, the engine hour Maximum Increment is set at 24.00 and Odometer is set at 10.
-
If any two back to back entries are greater than the Maximum Increment of 24.00, Maintain-It will flag that PM Schedule for that vehicle with an over limits warning.
Sample:
| Monday: Engine hour reading 1000 | Tuesday: Engine hour reading is 1090. |

-
Because the increment of 90 is greater than the established maximum increment of 10, Maintain-It will turn on the over limits indicator in PM Center.
Over Limit Correction
If a vehicle has an over limits warning, the user should review the entries to identify and correct incorrect values.
Usage Entry
|
Navigate To: Maintenance>Usage Entry |
OR Double Click the Over Limit Line Item
|

-
Select the Entry parameters to reach the asset with the potential incorrect vaue.
-
Double click on the asset in the grid with the incorrect value.
-
Modify Usage Entry window will open.
-
Enter the correct readings and save.
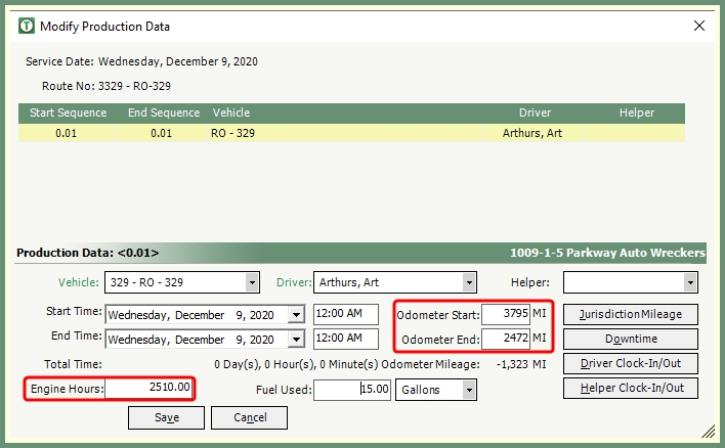
Modify Production Data
The production data on a completed route in Haul-It can be modified to correct reading values. These reading updates will automatically correct within Maintain-It.

-
Right click on the completed route in Route Center.
-
Select Modify Production Data.
-
Double click on the sequence with the readings to be updated.
-
Enter the correct Odometer and/or Engine Hours.
-
Save.
When first accessing the PM Center you will be presented with a screen displaying all PM Schedules for All Vehicles.
-
To filter by Containers, click on Containers in the Asset Type.
-
To only see PM’s that are Overdue (Past Due or within Interval Buffer), click Only Show Assets Due for PM.
-
To only see PM's for a specific Vehicle or for a specific Vehicle Type, click the drop down and make your selection.
-
To only see Assets for a specific PM Schedule, click on the PM Schedule drop down and make your selection.
-
Sort the grid content by any column header.
-
Expand or reduce column sizes by clicking and holding the column margins to the preferred size.
-
Hover over a PM Schedule record in the grid to see current and previous Repair Order numbers

 .
.
Important: In order for the PM Service Schedule to be updated when Repair Orders are completed, the Repair Order must be created directly through PM Center. See Repair Order example.

-
Left double click on the vehicle and corresponding PM Schedule.
-
Preventive Maintenance Scheduling window will open.
-
Review the default entries and change as needed.
-
Fields in green are required. To change the default, click the drop down and make your updated selection.
-
To Send Reminder, enter the days in advance to deliver and add a message for the driver and/or service technician.
-
Select a Reminder Delivery method of Print on Route Sheet or Email Vehicle (vehicle must be setup with a valid email address). See example.
-
Review Repair Order options. See below.
Do Not Print Repair Order: Will not print a repair order.
Immediately: Will print repair order upon clicking save.
On Start Date: Will print repair order upon user logging into TRUX on the start date.
On Day Before Start Date: Will print repair order upon user logging into TRUX on the day prior to the start date.
-
Click Save to create Repair Order.
-
Once the Repair Order has been completed, the PM Schedule will reset the vehicle PM Increment to zero and the cycle starts again.
-
Repair Orders can be viewed in Repair Order Maintenance.
Important Note:
-
Repair Orders created through PM Center will indicate Generated by PM Schedule Description in the General Information section.

-
If this section is blank, the completed repair order was not generated from PM Center and will therefore not update an associated PM Schedule.
